In Outlook Block Emails but Continue to Receive Them
This article explains how to configure Outlook Junk Mail Filter to block as many junk emails as possible. You will also learn how to keep your filter up to date, how to move a good message from the Junk folder and ensure that no legitimate e-mails gets there.
The fact is that as long as junk mails has at least a tiny degree of effectiveness, say 0.0001%, spam will continue to be sent in millions and billions of copies. The email protocol was invented by scientists and it could never occur to them that someone would be sending all those car insurance quotes, loans, mortgage rates, pills and diets to unknown people. That is why, unluckily for all of us, they did not devise any mechanism that would ensure 100% protection against unsolicited e-mail. As a result, it is impossible to completely stop the delivery of junk messages. However, you can considerably reduce the number of spam in your inbox by automatically dispatching most of unwanted emails into the junk folder and in this way turn a roaring junk steam into a tiny brook that one can comfortably live with.
If you work in a corporate environment, then most likely you already have some anti-spam filter set up on your Exchange server that helps your company to opt out of junk mail. On your home computer or a laptop, you will have to configure the filter yourself and the aim of this article is to help you do this in the most efficient way to stop as much junk email as possible.
How Outlook Junk Mail filter works
Before you start setting up the Outlook Junk Mail filter, let me briefly explain, or maybe remind you, some basics of how filtering works. I am not going to waste your time digging deep in theory, just a few facts that you should keep in mind or check before you start configuring the filter settings.
- The Junk Email Filter moves suspected spam to the Junk folder but it doesn't block junk emails from getting into your Outlook.
- The following email account types are supported:
- Two Exchange Server accounts types - accounts that deliver to an Outlook Data File (.pst) and accounts in Cached Exchange Mode (.ost)
- POP3, IMAP, HTTP,
- Outlook Connector for Outlook.com
- Outlook Connector for IBM Lotus Domino
- Junk Mail Filter is turned on by default in Outlook, the protection level is set to Low to catch only the most obvious spam emails.
- In 2007 and lower, the Junk Mail filter runs before Outlook rules. In practice, this means that your Outlook rules won't be applied to messages moved to the Junk folder.
- Beginning with Outlook 2010, the Junk Email filter setting are applied to each e-mail account individually. If you have several accounts, the Junk Email options dialog shows the settings for the account whose folders you are currently viewing.
- And finally, while the Outlook Junk Email Filter protects against much of the spam sent to you, no filter is smart enough to catch every unsolicited email, even if set to the high level. The filter does not pick out any particular sender or a message type, it uses advanced analysis of the message structure and other factors to determine the likelihood of spam.
How to configure Junk Mail Filter to stop spam
The Junk Email Filter checks your incoming email messages automatically, however you can adjust its settings to give the filter some hits about what should be considered spam.
- Choose the spam protection level right for you
- Prevent legitimate e-mails from getting into Junk folder
- Why Blocked Senders list is not the best way to stop junk mail
- Block unwanted mail in foreign languages
Note: This is just a quick reminder that each email account in modern Outlook versions has its own Junk Mail settings. So, be sure to select a message in the right account before you open the Junk E-mail Options dialog.
To tweak the Junk Email Filter settings in Outlook, go to the Home tab > Delete group > Junk > Junk E-mail Options… 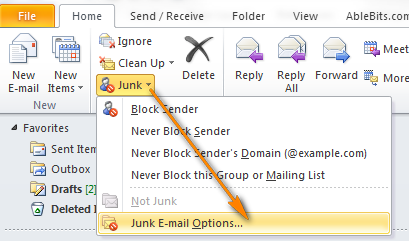
If you use Outlook 2007, click Actions > Junk E-mail > Junk E-mail Options.
Clicking the Junk E-mail Options button opens the Junk E-mail Options dialog. The dialog consists of 4 tabs, each purposed to control a certain aspect of spam protection. The tabs' names are self-explanatory: Options, Safe Senders, Safe Recipients, Blocked Senders and International. So, let's have a quick look at each and highlight the most essential settings.
Choose the spam protection level right for you (Options tab)
You select the needed level of protection on the Options tab, and here you have 4 filtering options to choose from:
- No Automatic Filtering. If you select this option, the automatic Junk Email Filter will be turned off. However, if you previously entered some addresses or domains to the Blocked Senders list, they will still be moved away to the Junk folder. See how to turn off the Junk Email Filter completely.
- Low level. This is the most tolerant option that filters only the most obvious junk messages. Low level is recommended if you receive quite few unsolicited emails.
- High level. Setting protection level to High is often considered the best practice to obtain the maximum protection. However, along with spam it may also misidentify legitimate messages and move them to Junk. So, if you opt for the High level, don't forget to periodically review your Junk mail folder.
- Safe lists only. If this option is selected, only emails from people you have added to the Safe Senders and Safe Recipients lists will get into your Inbox. Personally, I cannot imagine a scenario when I would select this option, but if you want this maximum level of restrictions, you can choose it.
Besides the four protection levels, the Options tab has three other options (the last two are active if you choose a protection level other than "No Automatic Filtering"):
- Permanently delete suspected junk email instead of moving it to Junk folder
- Disable links in phishing messages
- Warm about suspicious domain names in e-mail addresses
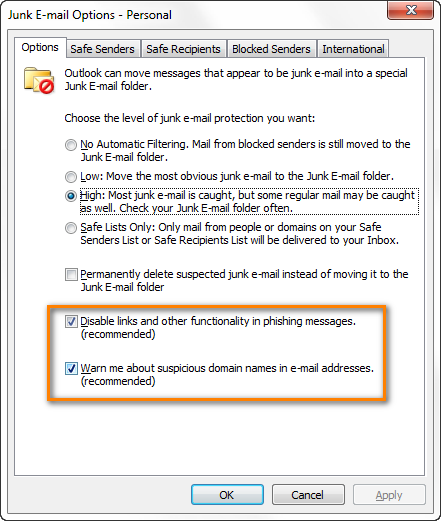
While the last two options seem to be very reasonable and safe precautions that cannot harm you in any way, I would rather not enable the first option to Permanently delete suspected junk email. The point is that even good messages may occasionally get to the Junk mail folder (especially if you opted for the High protection level) and if you choose to permanently delete suspected junk messages, then you won't have any chance to find and recover a message mistakenly treated as junk. So, you'd better leave this option unchecked and periodically look through the Junk e-mail folder.
Prevent good emails to be treated as junk (Safe Senders & Safe Recipients lists)
The next two tabs of the Junk E-mail Options dialogs let you add email addresses or domain names to the Safe Senders and Safe Recipients lists. E-mail messages from anyone on these two lists will never be considered spam regardless of their content.
Safe Senders List. If the junk mail filter mistakenly considers a legitimate message from a particular sender to be spam, you can add the sender (or the entire domain) to the Safe Senders List.
Safe Recipients List. If your e-mail account is configured to receive mail only from trusted senders and you don't want to miss a single message sent to this email address, you can add such address (or domain) to your Safe Recipients list. If you are on some mailing / distribution lists, you can also add a distribution list name to your Safe Recipients.
To add someone to your safe list, simply click the Add button in the right-hand part of the window and type an e-mail address or domain name. 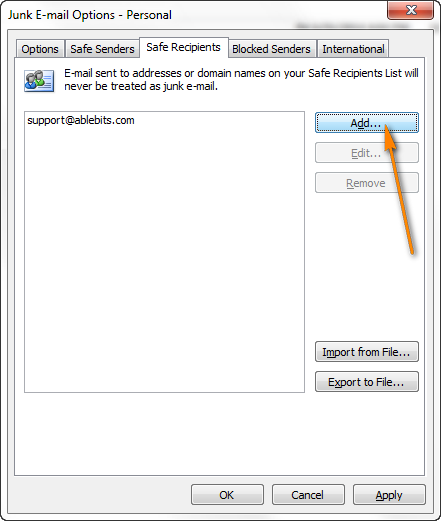
Another way to add a contact to your Safe list is to right click a message, click Junk and choose one of the options: Never Block Sender's Domain, Never Block Sender or Never Block this Group or Mailing List. 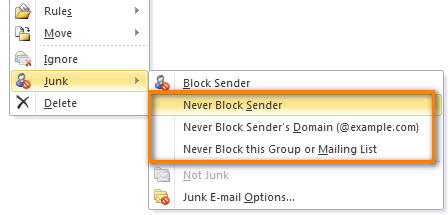
To have the trusted contacts added to the Safe Senders list automatically, you can check two additional options that reside at the bottom of the Safe Senders tab:
- Also trust e-mail from my Contacts
- Automatically add people I email to the Safe Senders List
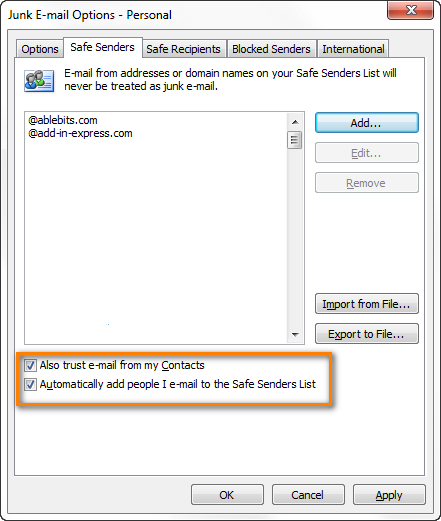
You can also import Safe Senders and Safe Recipients from a .txt file by clicking the Import from File… button located in the right-hand part of the dialog window.
Note: If you are connected to an Exchange Server, names and e-mail addresses in the Global Address List are automatically considered safe.
Why Blocked Senders list is not the best way to stop junk email
The Blocked Senders list is the opposite of the two safe lists we've just discussed. All messages arrived from individual email addresses or domains on this list will be considered spam and automatically moved to the Junk email folder regardless of their content. At first sight, adding unwanted senders to the Blocked list seems to be the most obvious way to opt out of junk e-mail, but in truth it has very little effect and here's why:
- Firstly, because spammers won't typically use the same email addresses twice and adding each address to the Block Senders list is a mere waste of time.
- Secondly, if you have an Outlook Exchanged based account, the Blocked Senders list as well as two Safe lists is stored on the Exchange server that allows storing up to 1024 addresses in these lists combined. When your lists reach this limit, you will get the following error message: "An error occurred processing your Junk E-mail list. You are over the size limit allowed at the server."
- And thirdly, when receiving email the first thing that Outlook does is check incoming messages against your junk filter lists. As you understand, the shorter your lists are the more quickly inbound email gets processed.
"This is Okay, but what shall I do if I am being bombarded with thousands of junk emails?" you may ask. If all those spam messages come from a certain domain name, then of course, you shall add it to the Blocked Senders list. However, instead of right-clicking an email and choosing Junk > Block Sender from the pop-up menu as most people do, block the entire domain using the Junk E-mail Options dialog. At that, there is no need to enter sub-domains or use wild characters such as an asterisk (*). You can ban the entire domain by simply entering @some-spam-domain.com and stop all junk mail coming from that domain. 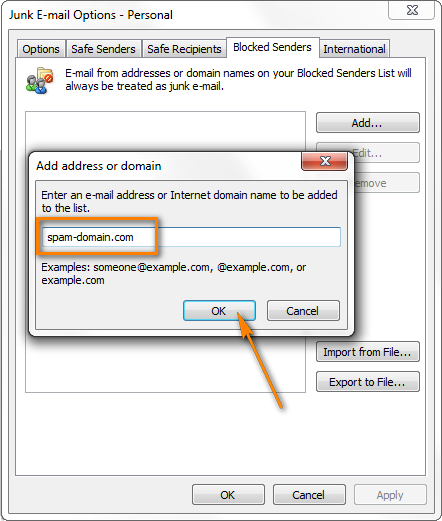
Note: Most often spammers send all those unsolicited emails from fake addresses, different from what you see in the From field. You can try to find the real address of the sender by looking in the Internet Headers of a message (open the message and go to the File tab > Info > Properties).
If you do need to block a particularly annoying spammer, you can simply right-click the message and choose Junk > Block Sender from the context menu. 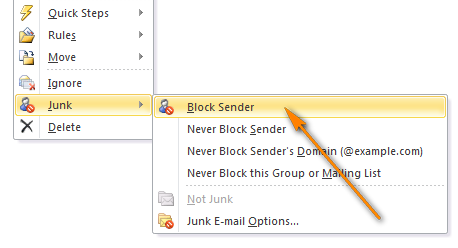
Block unwanted mail in foreign languages or from specific countries
If you want to stop receiving email messages in foreign languages that you don't know, switch to the last tab of the Junk E-mail Options dialog, International tab. This tab provides the following two options:
Blocked Top-Level Domains List. This list lets you block email messages from specific countries or regions. For example, if you select CN (China) or IN (India), then you will stop receiving any messages if a sender's address that ends with .cn or .in. 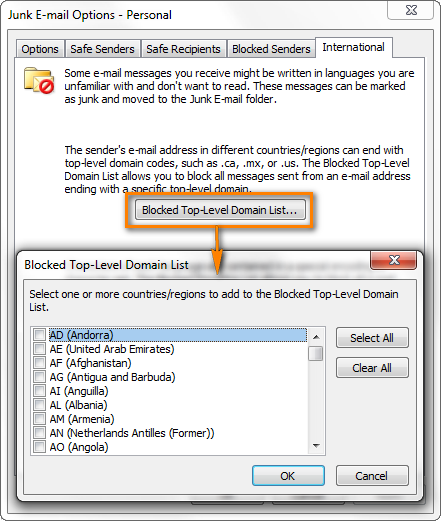
Though, nowadays when nearly everyone has gmail or outlook.com accounts, this option will hardly help you get rid of many junk emails. And this brings us to the second option that looks much more promising.
Blocked Encodings List. This list enables you to eliminate all unwanted e-mail messages formatted in a specific language encoding, i.e. displayed in a language that you don't understand and cannot read anyway. 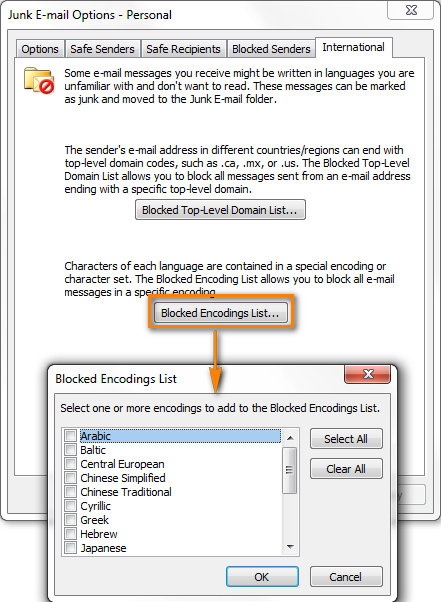
Note: Messages that have unknown or unspecified encodings will be filtered by the Junk E-mail Filter in the usual way.
How to keep your Junk Mail Filter up to date
Most spam is obvious and easily recognizable. However there are some very sophisticated spammers who diligently research Microsoft's junk mail filter technology, elicit the factors that cause an email to be treated as junk and continuously improve their spam strategies. On the other hand, Microsoft takes good effort to fight the latest spamming techniques and adjusts the junk filter accordingly in order to reduce junk email in your inbox. So, it definitely stands to reason to always have the most recent version of the junk mail filter in your Outlook.
The easiest way is to turn automatic Windows updates on. You can verify if this option is enabled on your computer by going to the Control Panel > Windows Update > Change settings. Under Important updates, choose the options right for you. 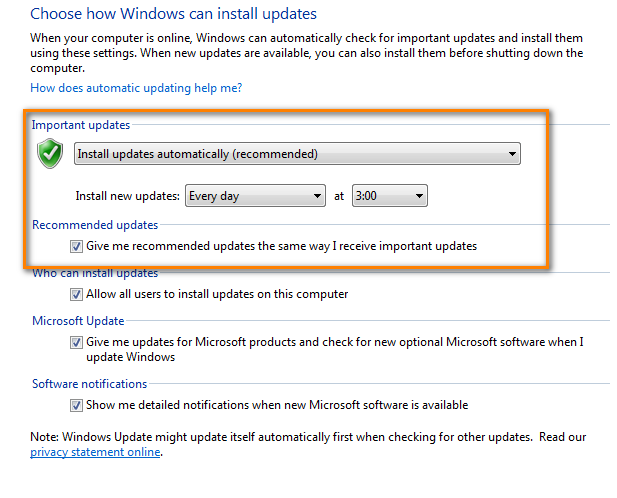
As you can see in the screenshot above, my preference is to "Check for updates but let me choose whether to download and install them". Under Recommended updates, you can select "Give me recommended updates the same way I receive important updates". Note that you need to have the admin rights to be able to change the updates options.
As an alternative way, you can always download the latest version of the Junk E-mail Filter for Outlook from Microsoft's website.
How to report spam to Microsoft to improve the junk email filter
If even the latest version of the junk mail filter does not catch all spam e-mails that get into your inbox, then you can report such messages to Microsoft and in this way help them improve the effectiveness of their junk e-mail filtering technologies.
You can do this using the Junk E-mail Reporting Add-in for Outlook, the download links are available here. Go through the installation process by simply clicking Next, Next, Finish and after restarting your Outlook you will find a new "Report Junk" option added to your Junk filter.
Now you can report unsolicited messages directly to Microsoft in the following ways:
- Select a junk message in the list of emails and click Report Junk on the Outlook ribbon (Home > Junk > Report Junk)
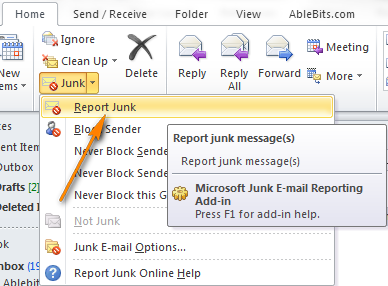
If you have already opened a junk e-mail, proceed in the same way.
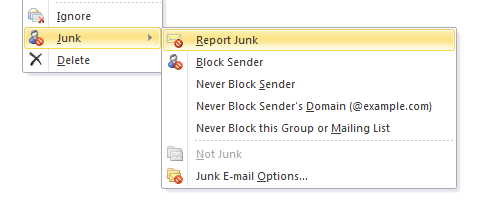
- Right click a spam email and select Junk > Report Junk from the context menu.
How to take a legitimate e-mail out of the Junk folder
As already mentioned in the beginning of this article, even good legitimate e-mail may occasionally be treated as spam and moved to the Junk E-mail folder. No one is perfect in this world, nor is the junk filter : ) That is why, remember to check your Junk folder once in a while. How often you do this is up to you. If you set your filter to the High level to stop as many junk messages as possible, it's a good idea to check often. I check it at the end of my work day to make sure I've covered everything.
If you spot a legitimate message among junk emails, you can right click it and choose Junk > Not Junk from the context menu. 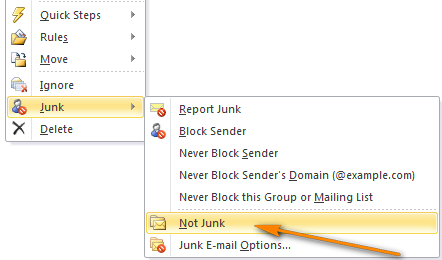
Clicking Not Junk will move the message to your Inbox and provides you the option to Always trust e-mail from that e-mail address. It you select this check box, the sender's address will be added to your Safe Senders list, and the junk filter won't make the same mistake again. 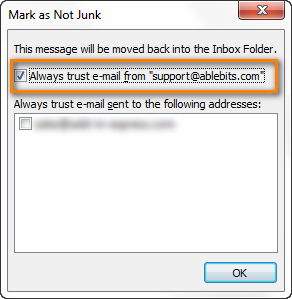
If you'd rather not add a particular sender to your safe list, then you can simply drag a message that was misidentified as junk to any other folder using the mouse.
Note: E-mails considered as spam and moved to the Junk E-mail folder are automatically converted to the plain text format, any links contained in such messages are disabled. When you move a certain message out of the Junk folder, its links get enabled and the original message format restored, unless the Junk E-mail considers that those are suspicious links. In that case, even if you move it out of the Junk folder, the links in the message remain disabled by default.
How to turn off junk e-mail filtering
If important messages that you believe should be in your Inbox often end up in your Junk folder, then you can try to tweak the junk filter's settings as explained earlier in the article. If this does not help and you are still unhappy with the way the Junk Mail filter treats your e-mail, then you can turn it off and use other methods to stop junk email, e.g. third party tools or services.
In order to turn the Microsoft Outlook's Junk filter off, go to Home > Junk > Junk E-mail Options… > Options tab, select No Automatic Filtering and click OK. 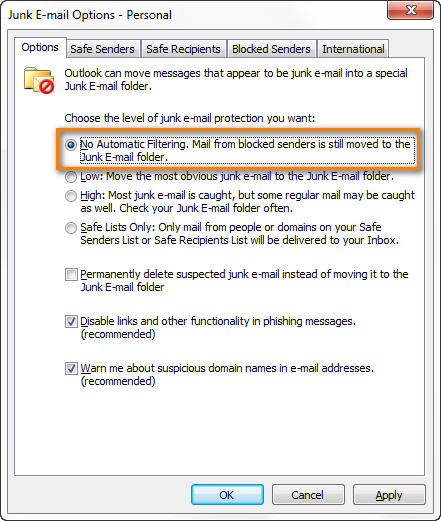
Note: When you select the No Automatic Filtering option, messages from your Blocked Senders list will still be moved to the Junk E-mail folder.
If you want to completely disable automatic filtering, you can do this in 2 ways:
- Clean your Blocked Senders list. In the Junk E-mail Options dialog window, navigate to the Blocked Senders tab, select all the addresses and click the Remove button.
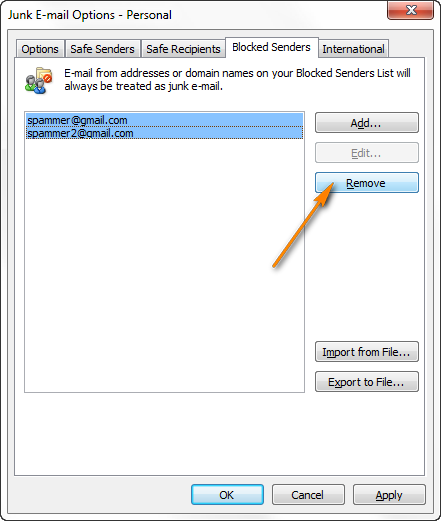
- If you think you might need the Blocked Senders list at some point in the future, then you can disable the Junk email filter in the registry.
- Open the registry (click the Start button and type regedit).
- Browse to the following registry key: HKEY_CURRENT_USER\Software\Policies\Microsoft\office\{version number}\outlook
- Right click anywhere within the right-hand pane, add the DisableAntiSpam DWORD and set it to 1 (Value 1 disables the junk filter, 0 enables it).
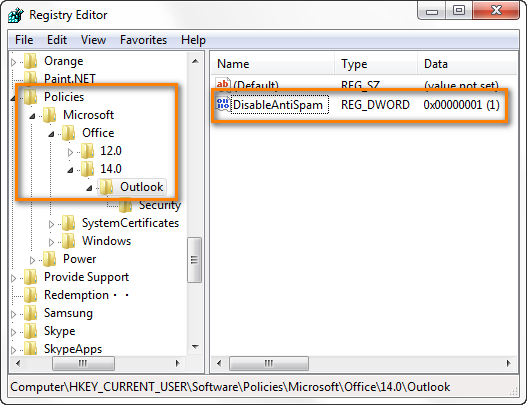
In this way you will have the junk filter completely disabled, including the Blocked Senders list. The Junk button on the Outlook ribbon will also be disabled and greyed out.
And this seems to be all for today. Quite a whale of info, but hopefully it will prove to be useful and help you get rid of all those ugly spam e-mails in your Inbox, or at least reduce their number. Just remember that all filters, even the most powerful ones, have some false-positives results. So, simply make it a rule to periodically review your Junk folder to ensure that you do not miss any important messages. Thank you for reading!
You may also be interested in
Source: https://www.ablebits.com/office-addins-blog/stop-junk-email-outlook/
0 Response to "In Outlook Block Emails but Continue to Receive Them"
Post a Comment